Getting started
Setting up your property on PulseHub
Follow these ten steps in order the first time you sign in. It takes about an hour for a property of thirty rooms, and most of that is typing in your residents. After setup, jump to whichever section you need.
Before you start
Create your account
You sign yourself up, with no call and no sales process. Your first 14 days are free and you are not asked for a card.
Sign up
Go to the sign-up page, enter your name, email, a password, and your country. The country you pick sets your currency and the wording used across the app, so choose the country the property is actually in.
Name your first property
Give it the name your residents would recognise. You can rename it later, and add more properties whenever you need them.
Sign in
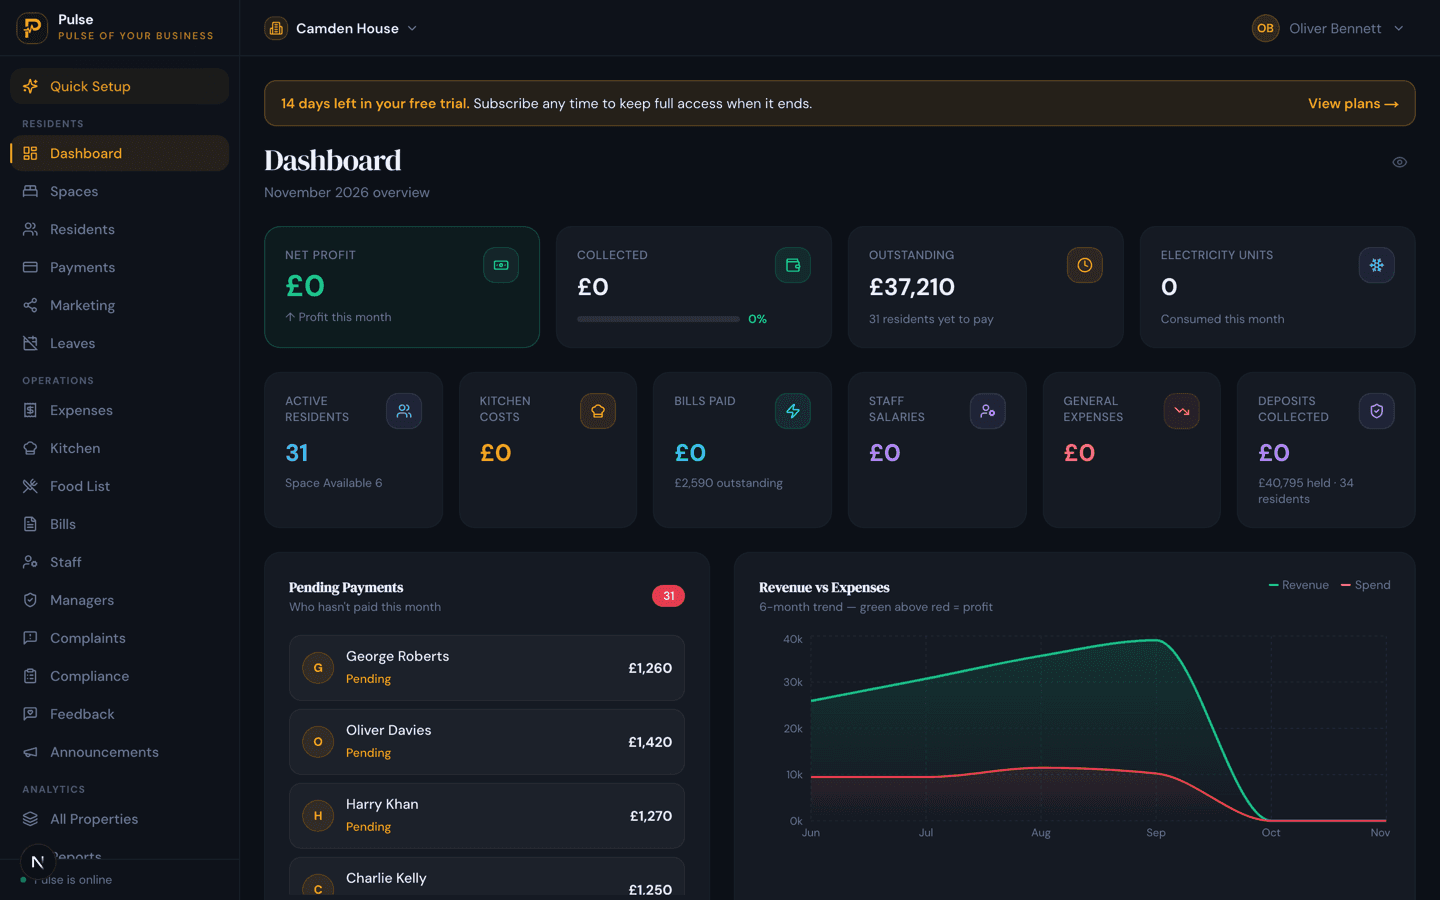
You land on the Dashboard with a Quick Setup link at the top of the sidebar.
1. Setup
Set up your property
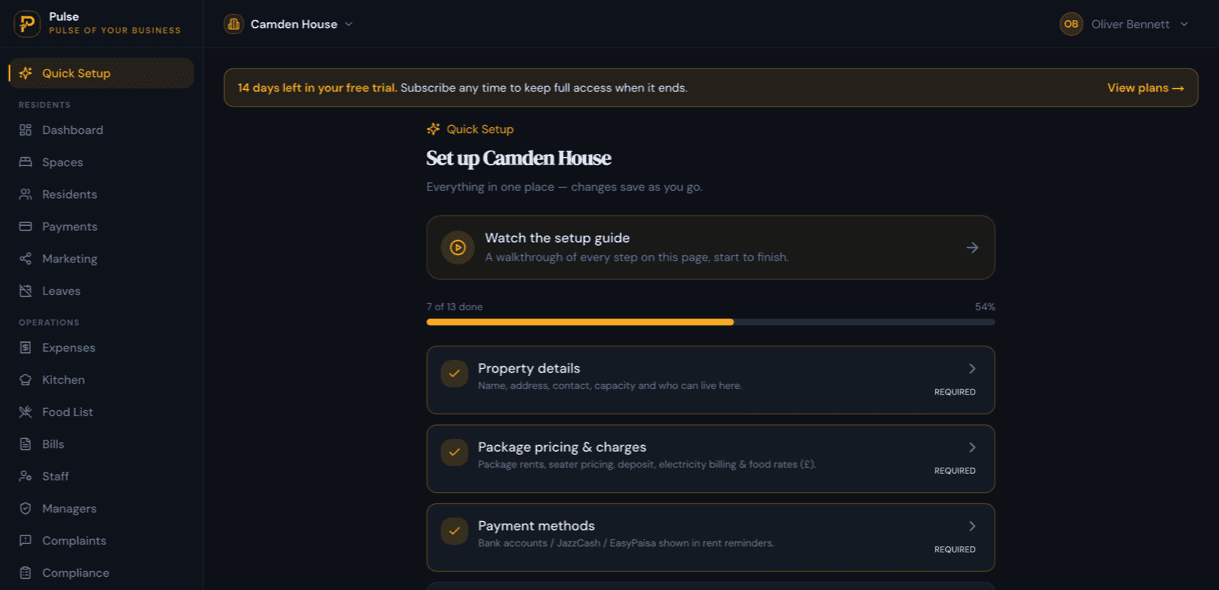
Everything you need is on one screen. Open Quick Setup, the first item in the sidebar, and work down the list, so you never have to go hunting through Settings.
Quick Setup is thirteen steps with a progress bar across the top. Three are marked Required, which are property details, pricing and payment methods, and the rest are optional, there when you want them. Each one opens in place and saves as you go, so you can stop halfway and come back.
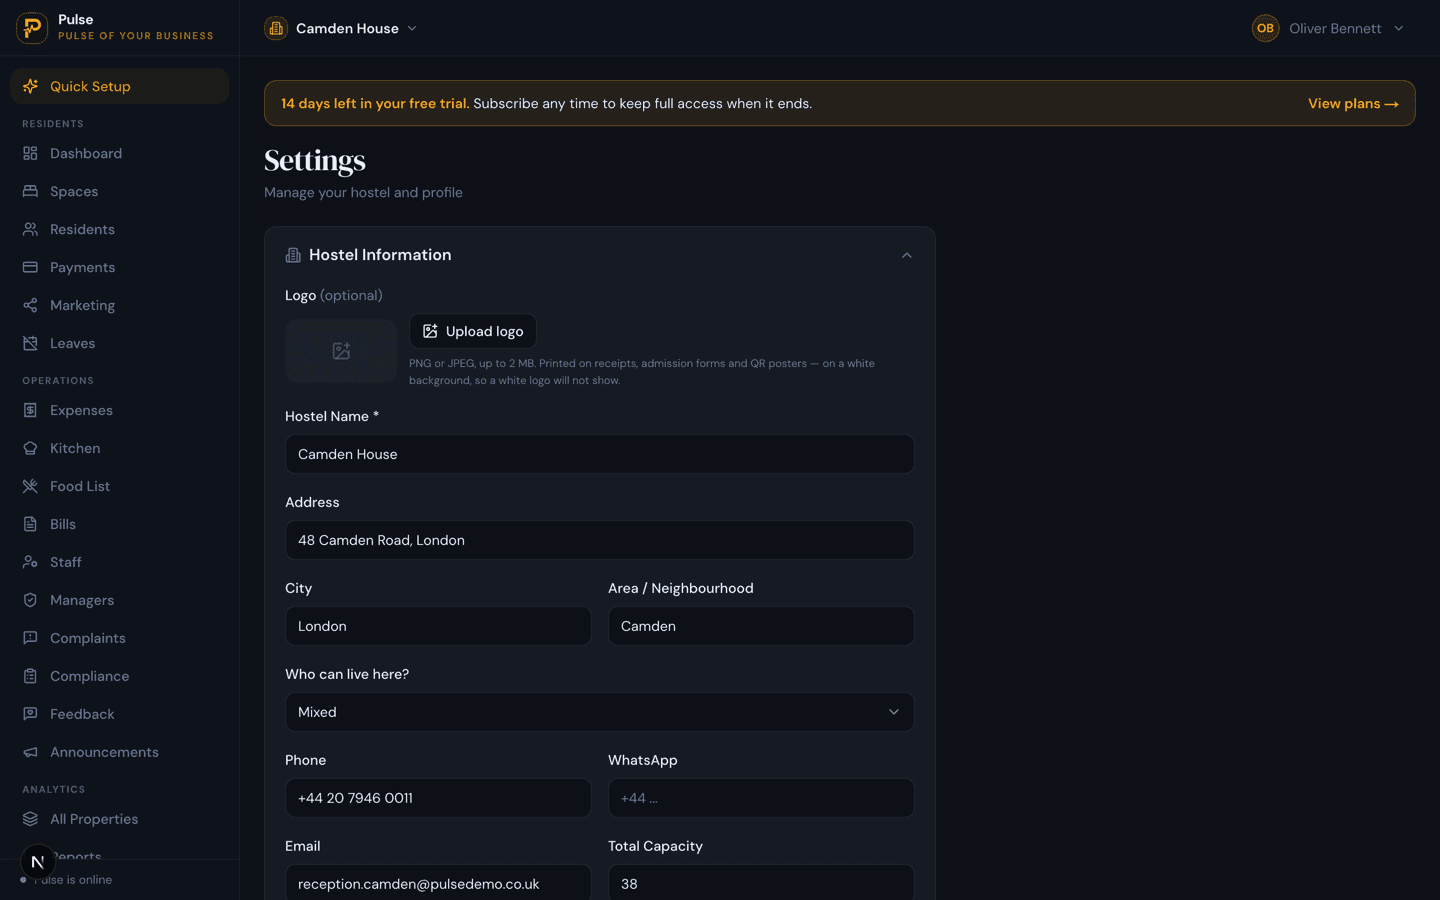
Step 1 — Property details (required)
Name, address, city, area, phone, email, capacity, and who can live here. This is what appears on receipts and your public pages, so write the name as residents would recognise it.
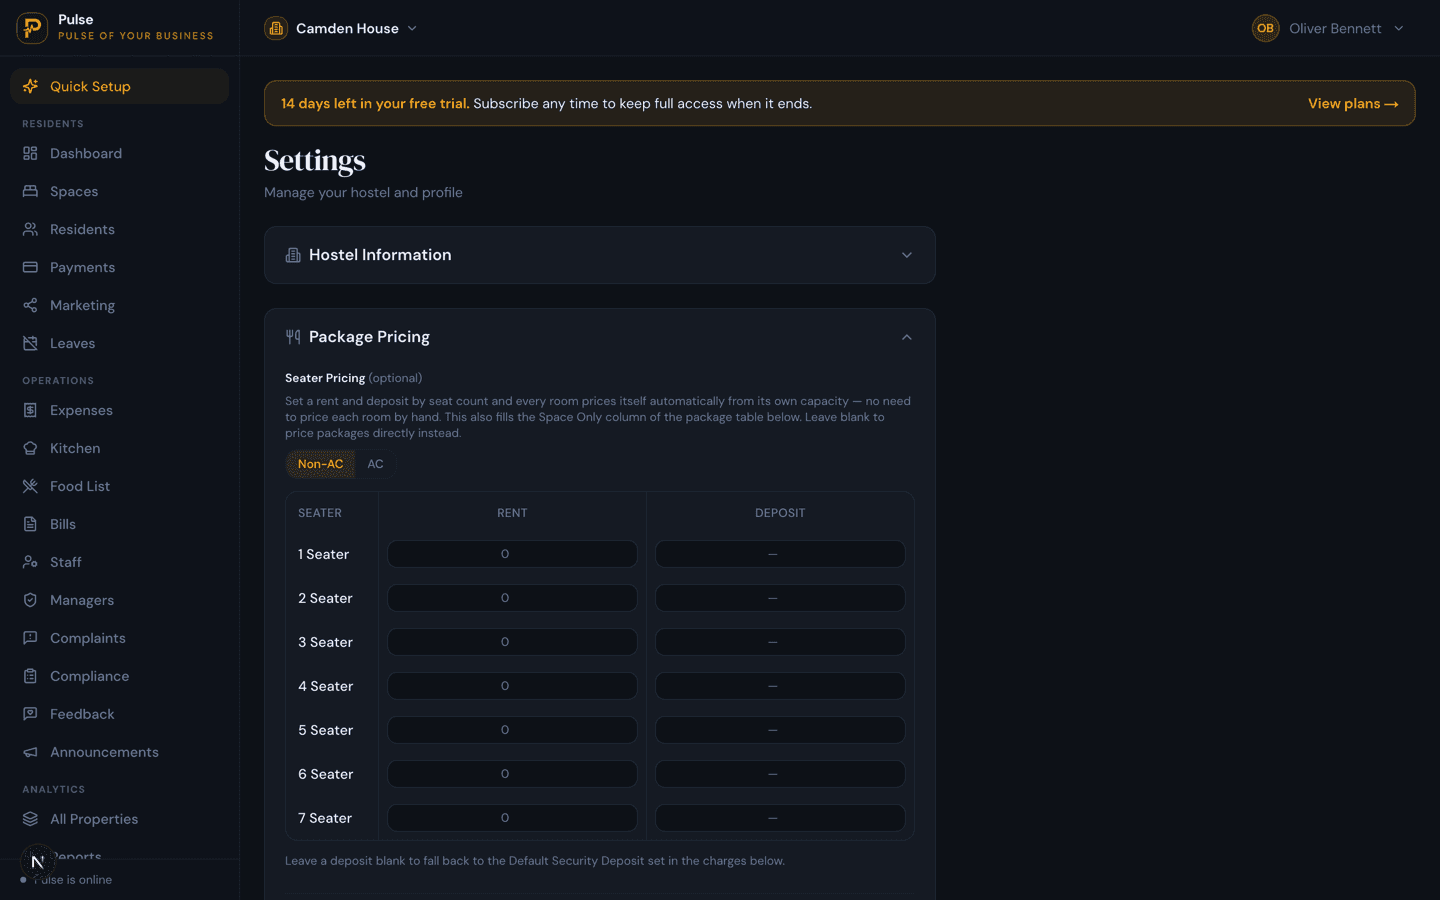
Step 2 — Package pricing & charges (required)
Seater Pricing is the quick way: set a rent and deposit per seat count, for a 1 seater, 2 seater, and so on, and every room prices itself. You never price a room by hand.
There are two price lists, behind the Non-AC and AC toggle above the table. A room takes its price from the list matching whether it has air conditioning, at its own seat count, so a 3-person room with AC takes the 3 seater price from the AC list, and the same room without AC takes it from the Non-AC list.
Fill in both lists if you have both kinds of room. They are independent: a seat count priced only on the Non-AC side leaves AC rooms of that size with no price at all, and PulseHub will tell you it could not work out the rent when you put somebody in one.
Underneath, the package table covers meals: Space Only, Space + Breakfast & Dinner, Space + 3 Meals. Fill in only the packages you actually sell.
Set your Default Security Deposit, your per-unit electricity rate, and your notice period in days in the same panel.
Step 3 — Payment methods (required)
The accounts you want residents to pay into. These are printed on rent reminders, and when you record a payment you pick which of them the money landed in, which is what makes your reconciliation tie back to a real bank statement.
The optional steps
- Billing date
- Leave it off and each resident bills monthly from their own join date (join the 25th, next bill the 25th). Set a fixed day and everyone bills on that day instead, with mid-month joiners prorated up to it.
- Terms & conditions
- Add your own house rules, or use the defaults. Applicants accept them before they can apply.
- Welcome email
- Your WiFi password, meal timings and 7-day menu, sent automatically to every new resident.
- Referral rewards
- Reward residents who bring a friend.
- Your web address
- A free public page for the property, with live availability.
Skip all of them on day one if you like. Nothing downstream depends on them, and the progress bar is a checklist, not a gate.
2. Inventory
Add your rooms
Quick Setup step 11 brings you here. You need at least one room before you can make anybody active, because a resident is always attached to a room.
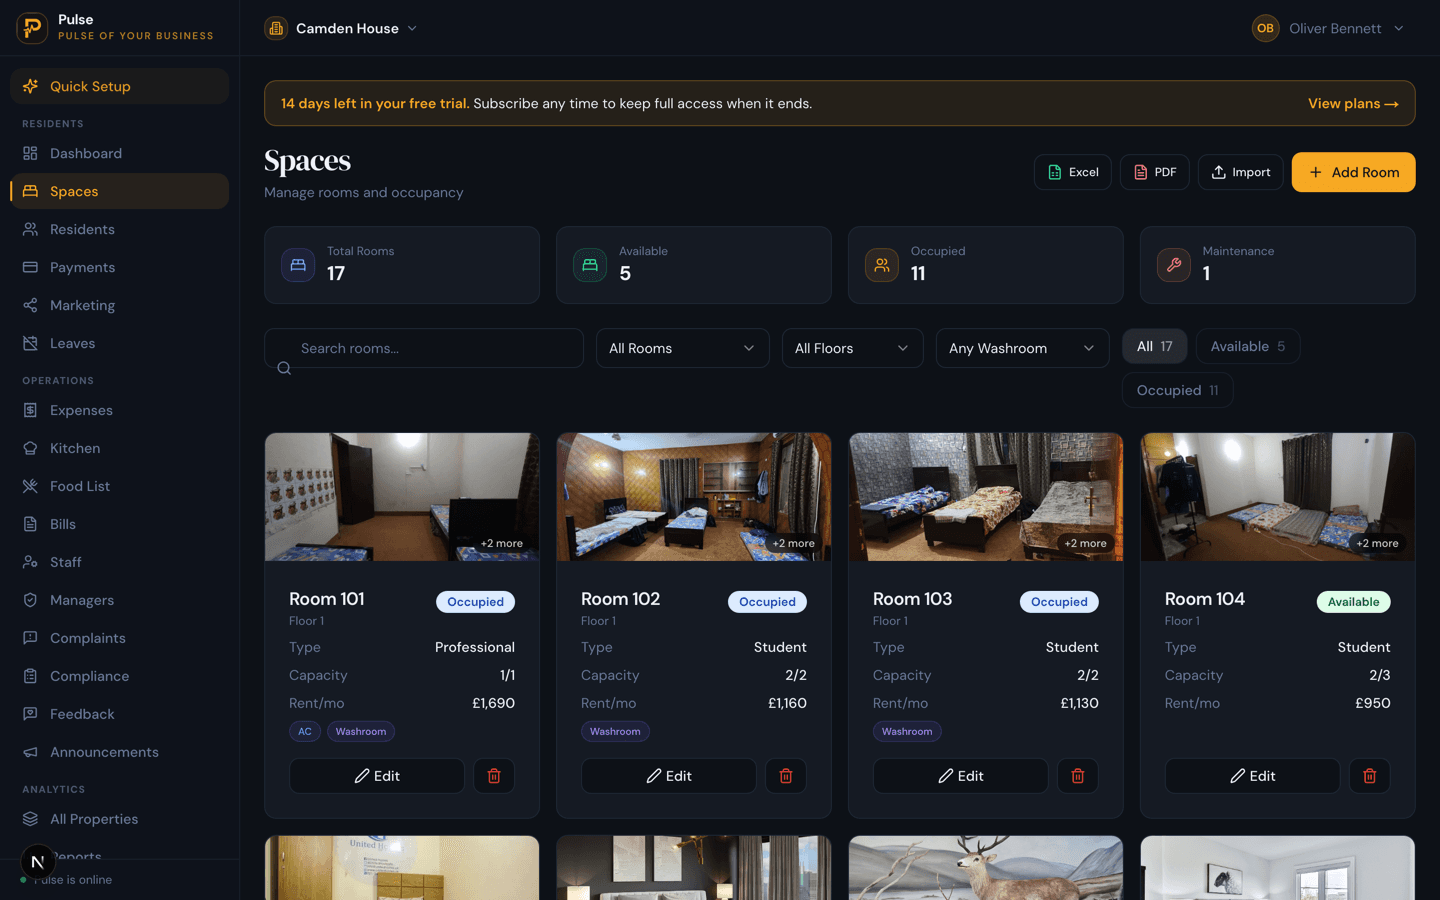
Tap Add Room
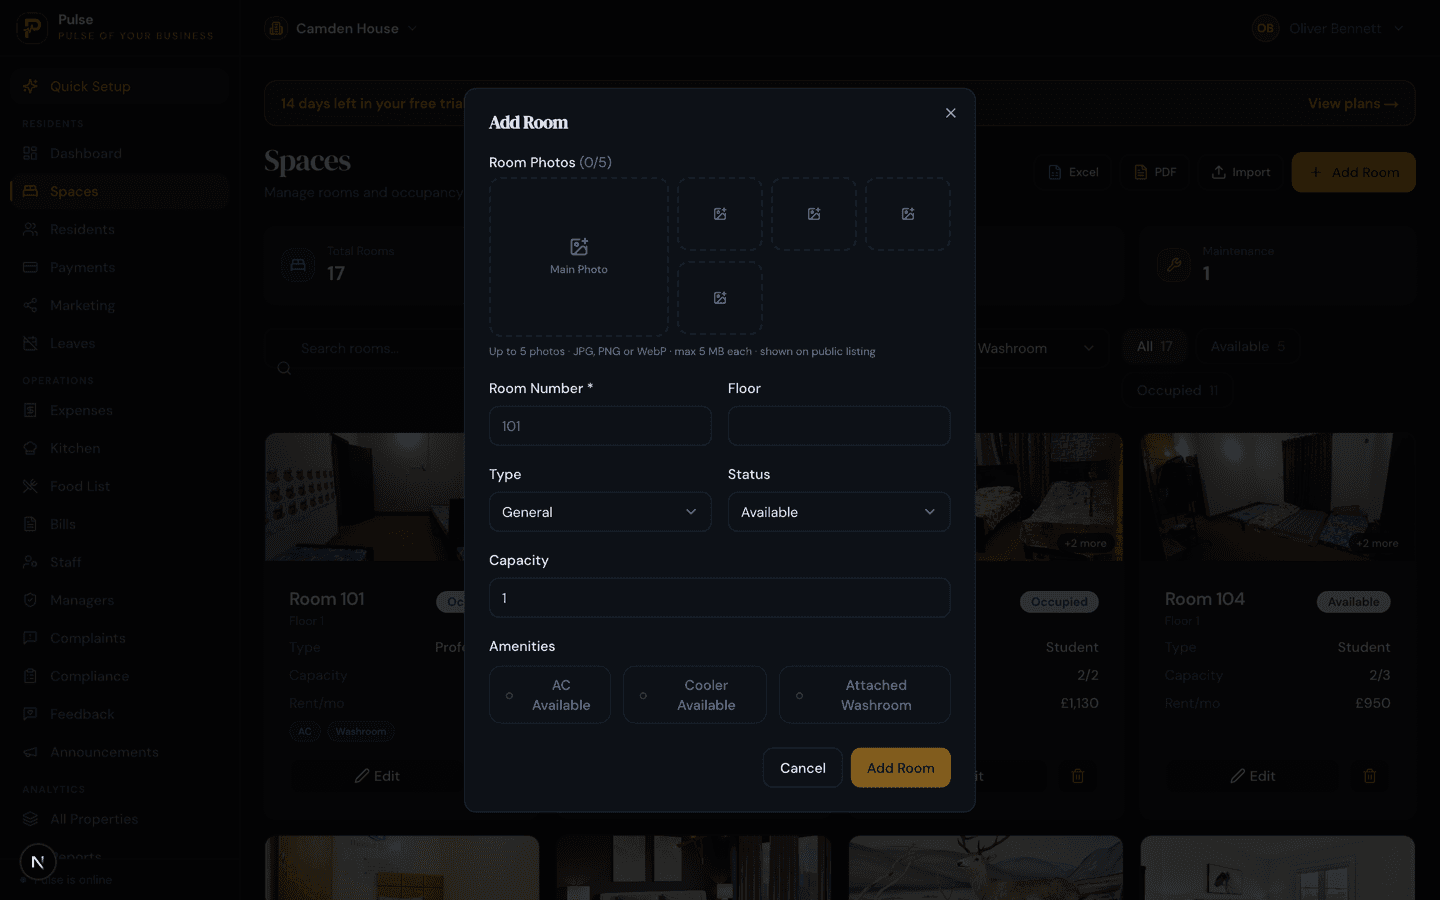
Enter the room number, floor, type and capacity. Capacity is how many people sleep in the room, and it is what picks the rent from your seater table, so a 3-person room must say 3.
Flag what the room has
Mark an attached washroom, or air conditioning, if it has them. The AC flag is what decides which of the two seater price lists the room is priced from, so get it right before you put anybody in. It also decides whether meter readings are asked for later.
Save, then repeat, or import
For a property with many rooms, Import takes a spreadsheet instead. Excel and PDF export the list back out.
3. People
Add your residents
Quick Setup step 12. The tabs across the middle are Active, Waiting, Checked Out, Applications and Vehicles.
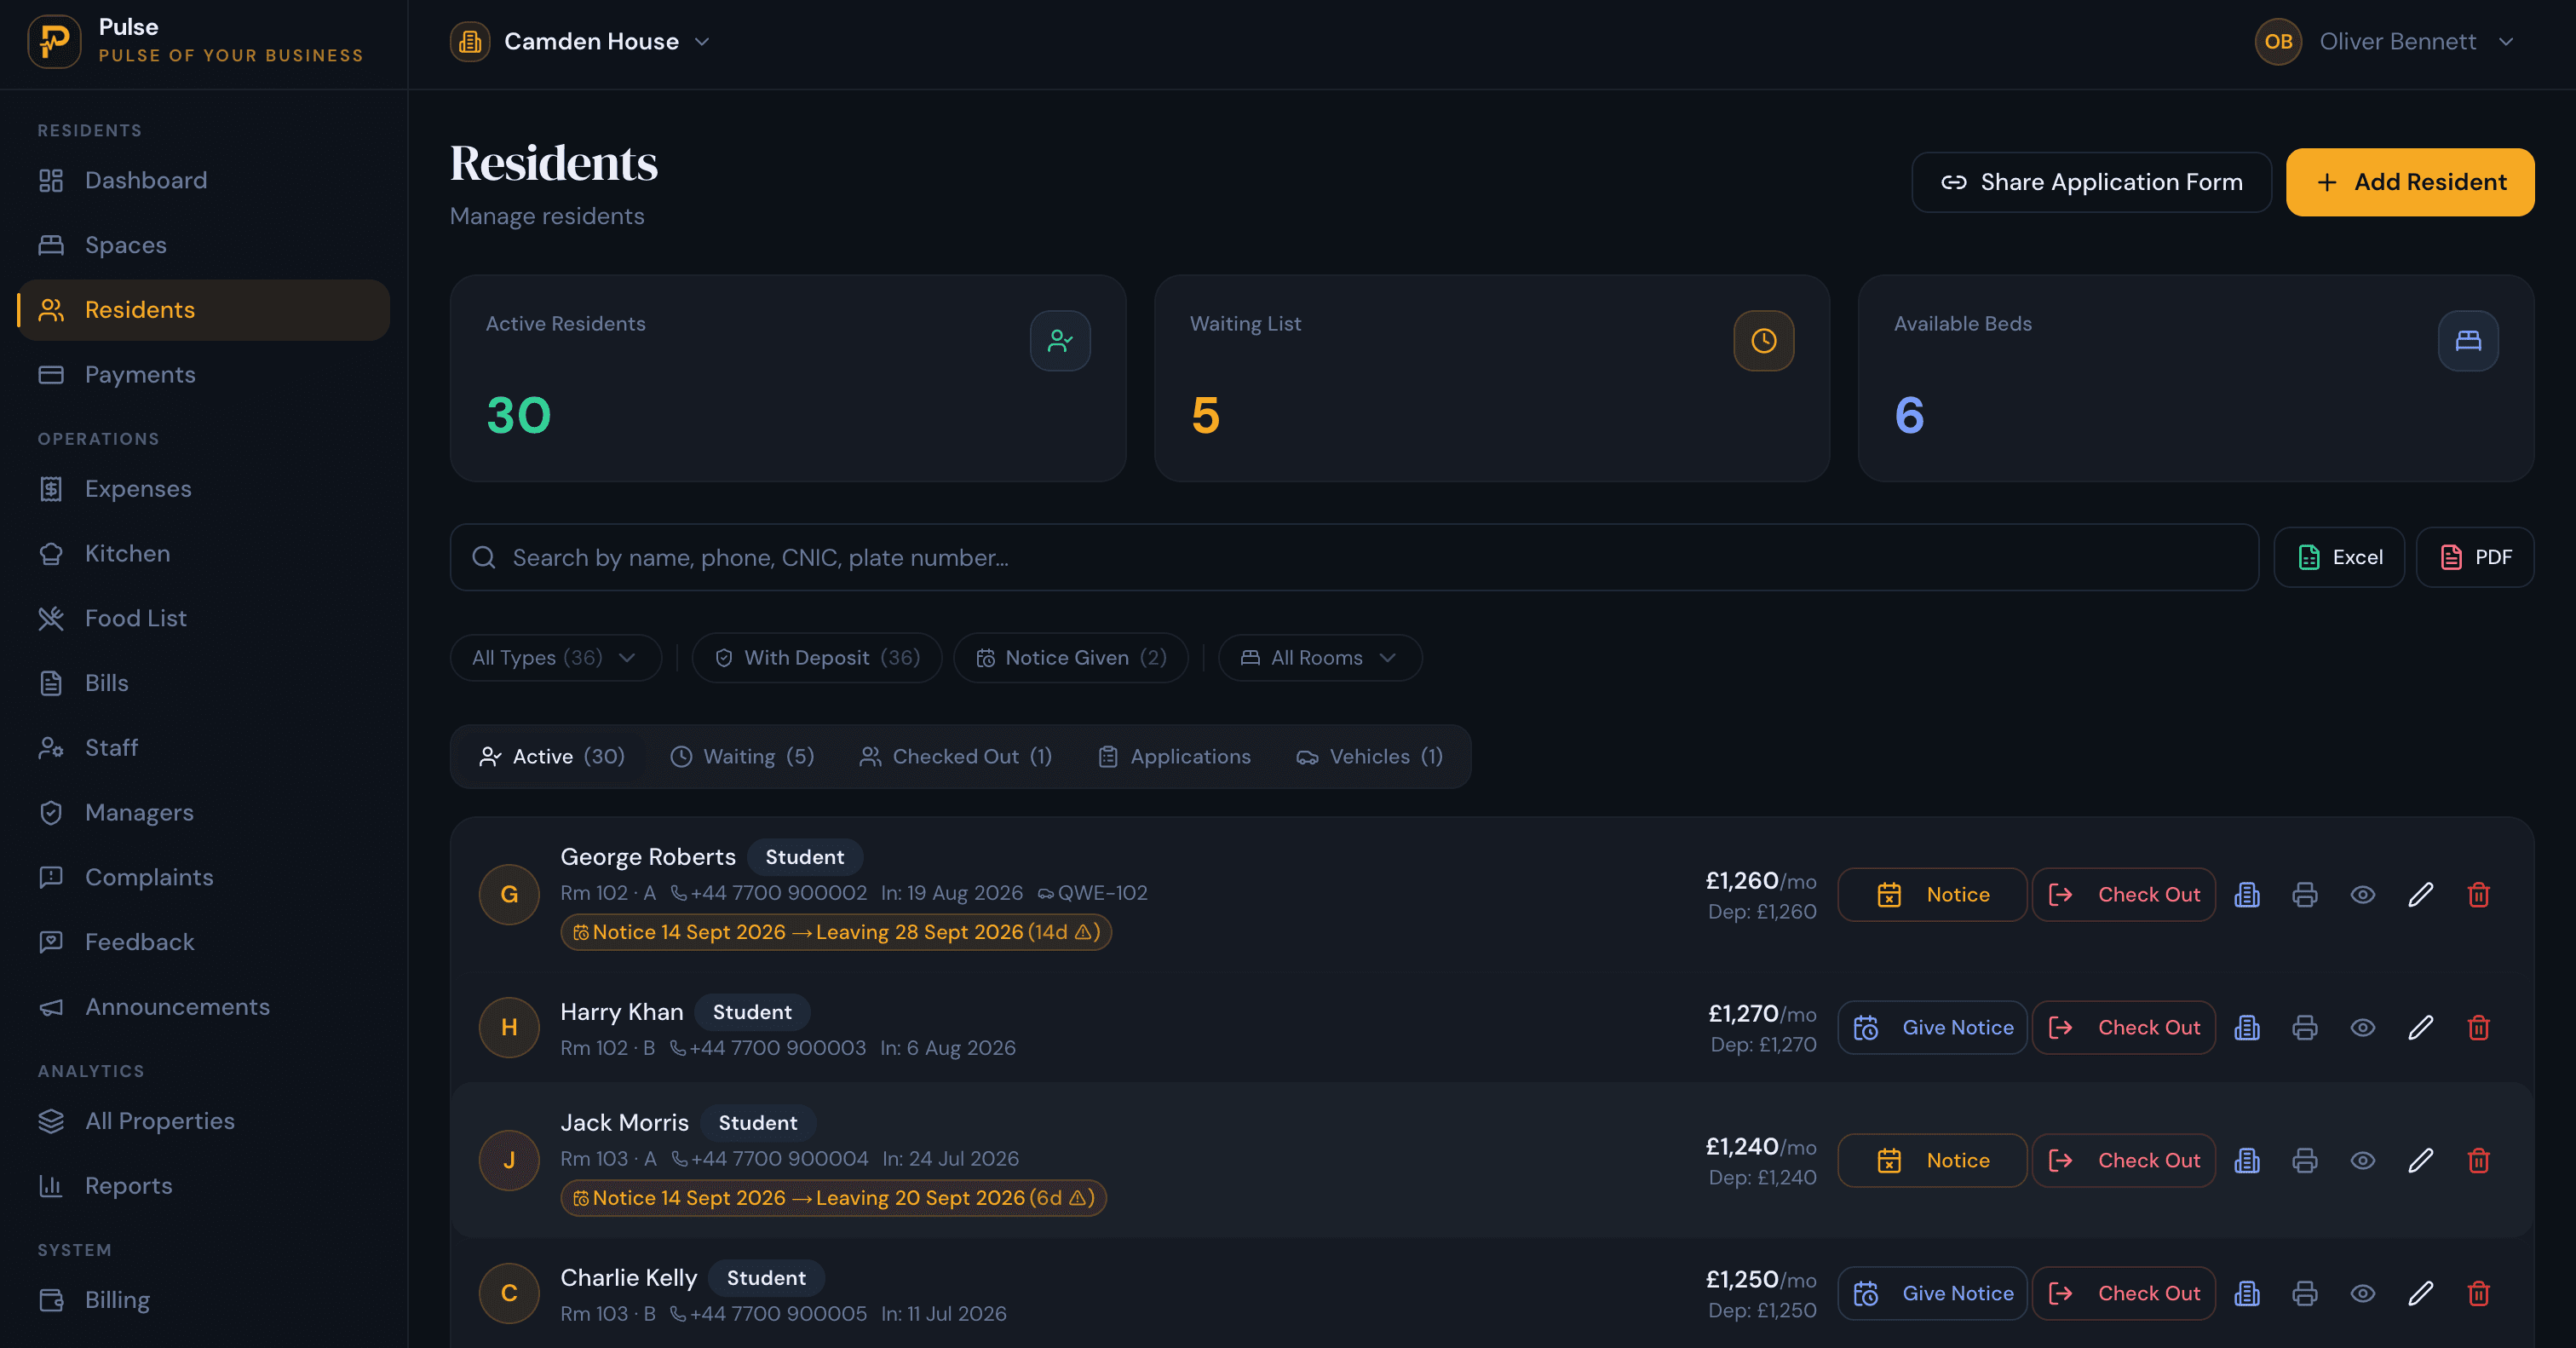
Three ways to get people in
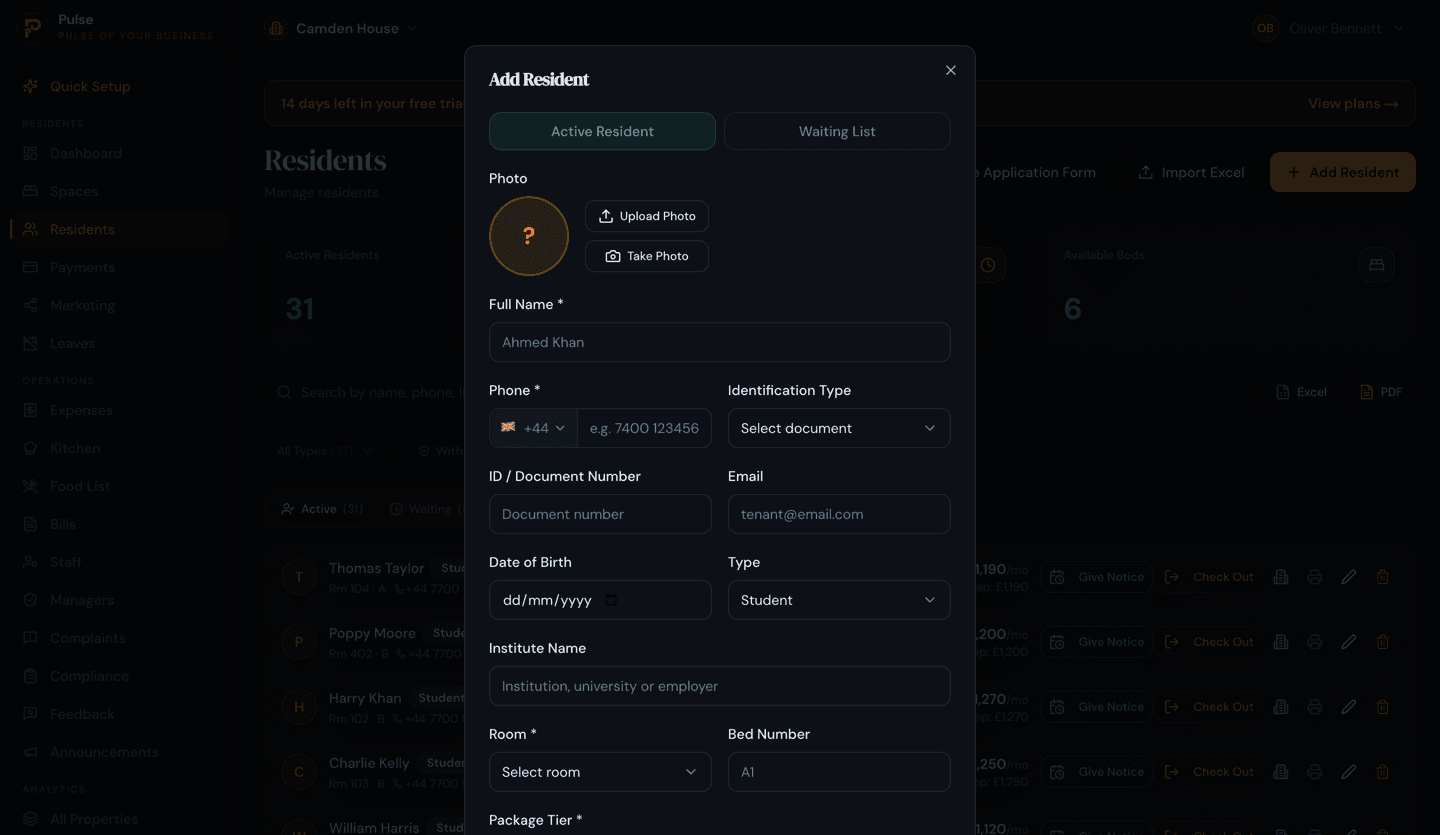
- Add Resident
- Type somebody in directly: name, contact, room, package and join date. Rent and deposit fill in from your pricing.
- Share Application Form
- Send your public link. People apply themselves and land in the Applications tab for you to approve.
- Import Excel
- The fastest route when you are moving an existing property onto PulseHub.
Joining mid-month
PulseHub asks whether a resident who joins part-way through the month pays for the whole month or only the days they are there. Pick per the agreement you made with them. It is set per resident, not once for the property.
When someone is leaving
- Give Notice
- Records the date they intend to go; PulseHub holds them to the notice period from your settings.
- Check Out
- The actual move-out: take the final meter reading, settle the balance, go through the room condition checklist, and the room frees up.
4. Money in
Collect rent
Quick Setup step 13, and where you will spend most of your month from then on. One row per resident, one month at a time.
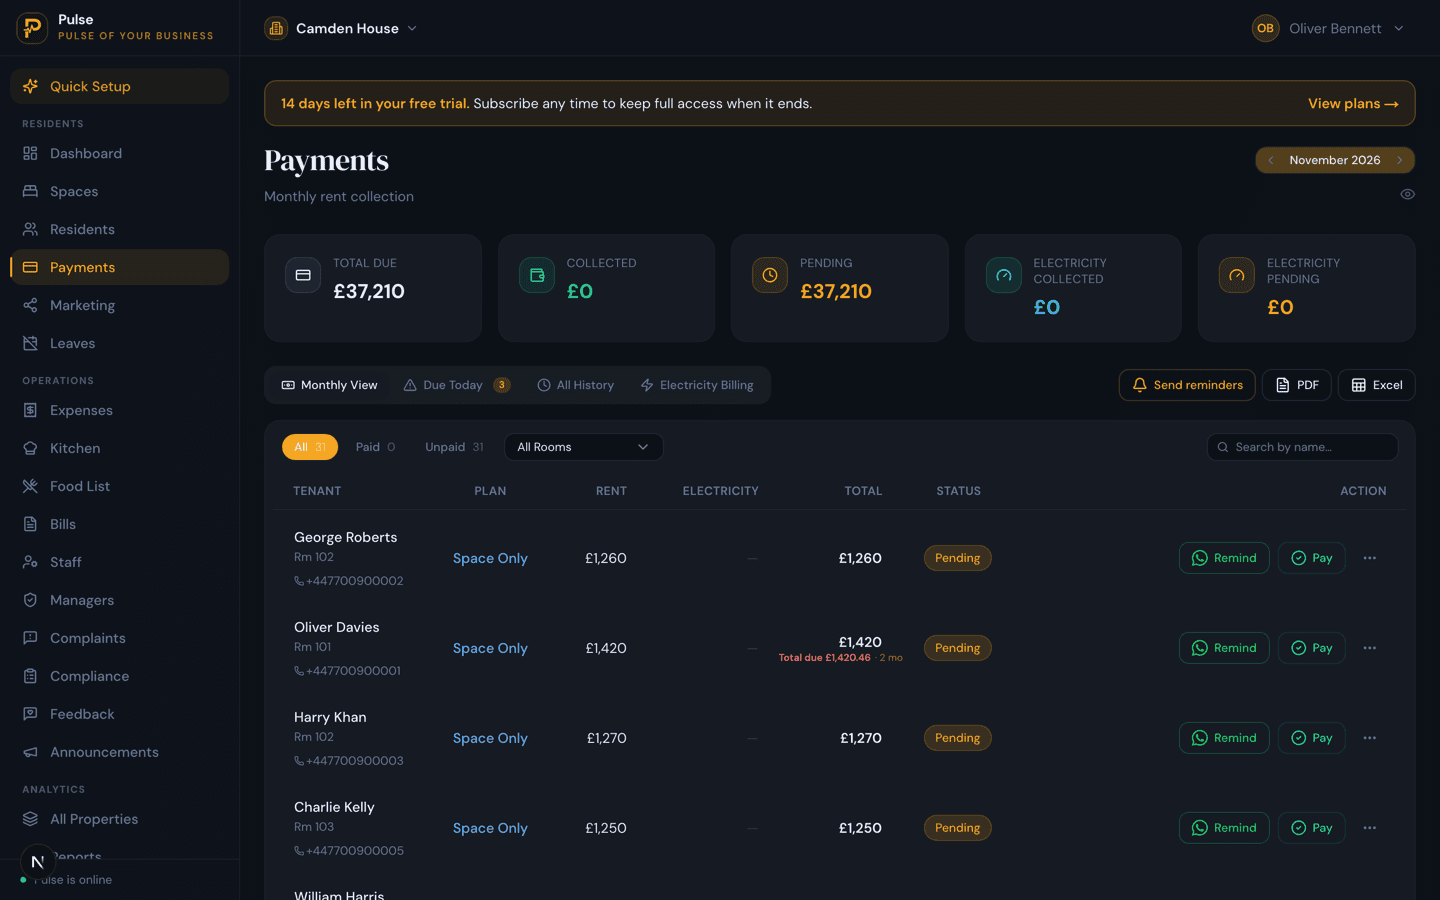
The four tabs
- Monthly View
- This month's rows.
- Due Today
- Who is due right now.
- All History
- Every payment ever taken.
- Electricity Billing
- Meter readings, covered in the next section.
Taking a payment
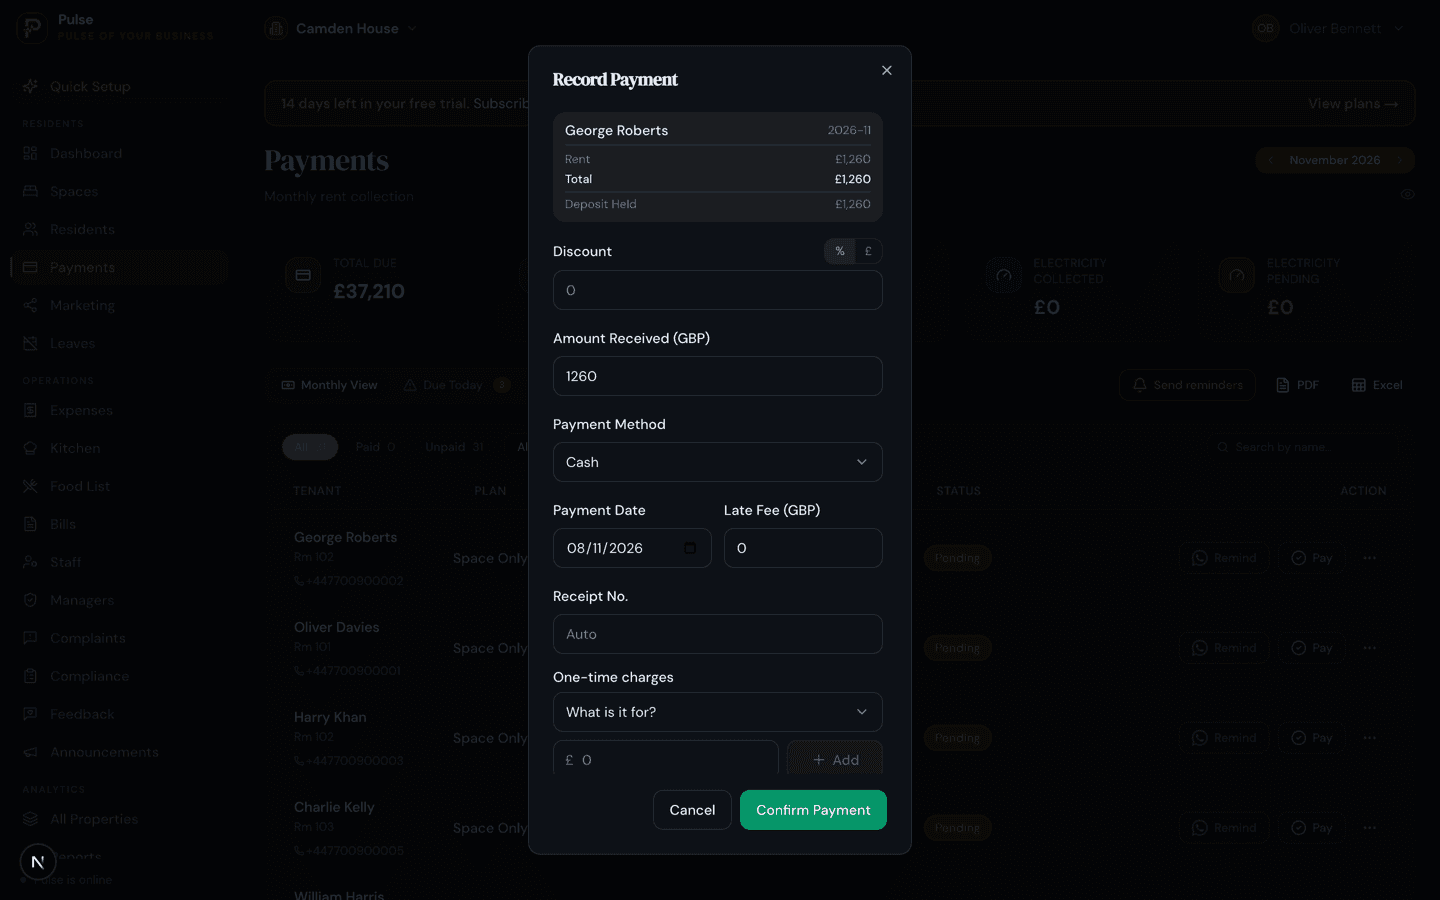
Tap Pay on the row. Enter what actually arrived; a part payment is fine, the row simply shows the remaining balance and stays unpaid until it is cleared. Choose whether it came in as cash or to a bank account; if it was a bank transfer, pick which of your accounts received it, so your reconciliation ties back to the right statement.
A receipt is produced for every payment and can be sent straight to the resident.
Chasing what is late
Remind on a single row, or Send reminders to chase everybody unpaid at once. Bulk reminders are capped at three a month so residents are not spammed.
5. Metered usage
Electricity
Only if you bill electricity by meter. Skip this section entirely if your rent is all-inclusive.
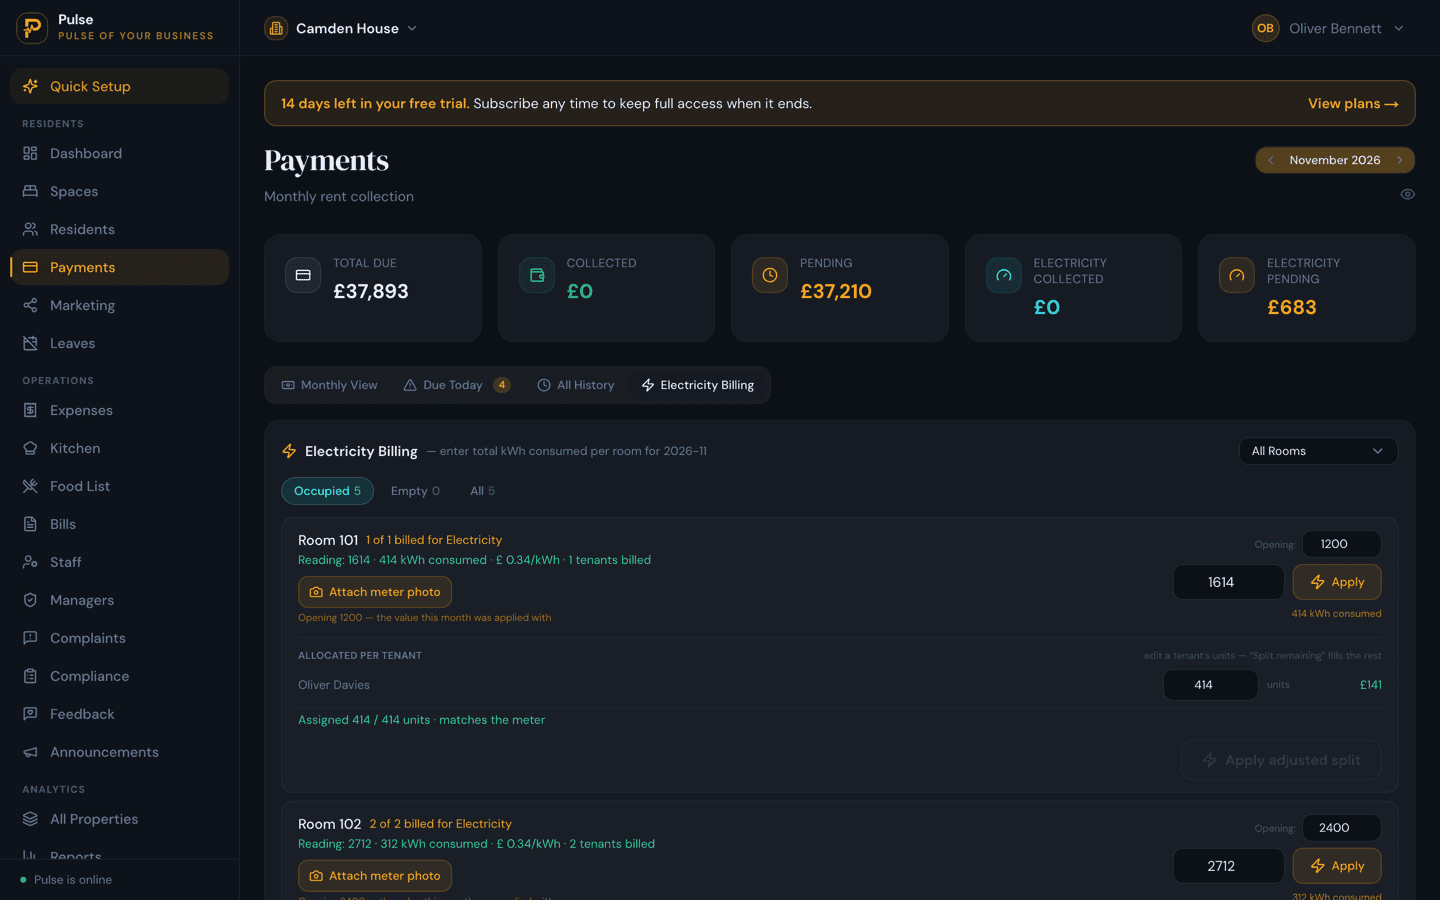
Enter this month's reading
One reading per room, taken from the meter on the wall.
Apply
PulseHub takes the difference from last month's reading, multiplies by your per-unit rate, and splits the cost between everybody living in that room. The charge lands on each of their rent rows.
6. Delegating
Your team
Two different things with similar names. Staff are people you employ and pay. Managers are people who can log in.
Staff
Your warden, cook and cleaner: who they are, what you pay them, when they were paid. A staff record is about payroll. It does not give anybody access to PulseHub.
Managers
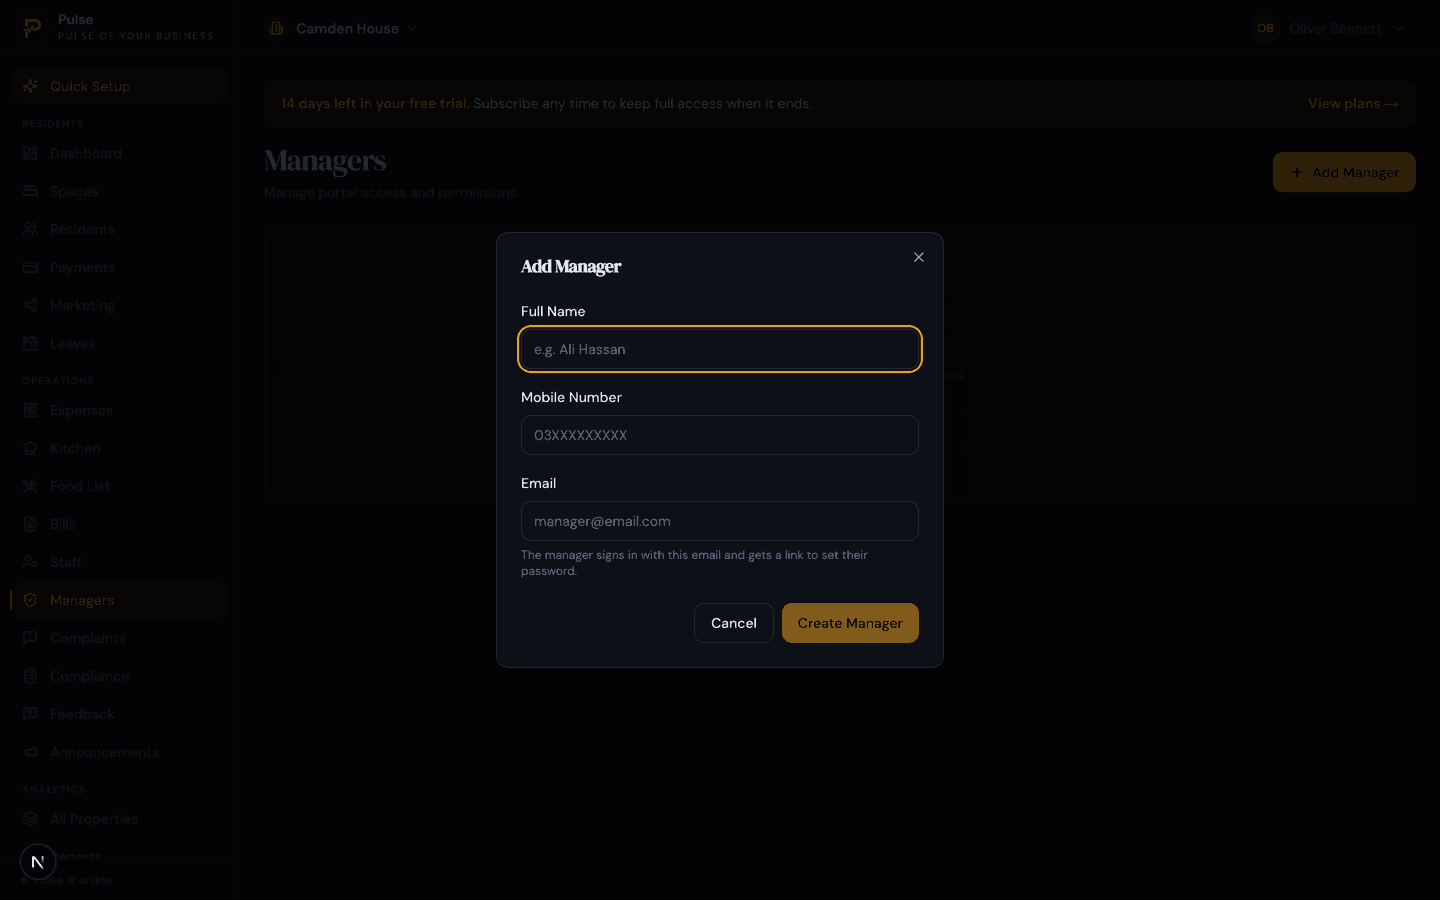
A manager signs in with their own email and password and sees only what you allow. Tap Add Manager, enter their details, and tick the permissions they need: collecting rent, adding residents, handling complaints, approving leave, and so on.
They set their own password on first sign-in, so you never hold it. You also choose which properties they cover, so a manager sees only the sites you assign them.
7. Day to day
Running the property
The parts you will use every week once setup is behind you.
Complaints
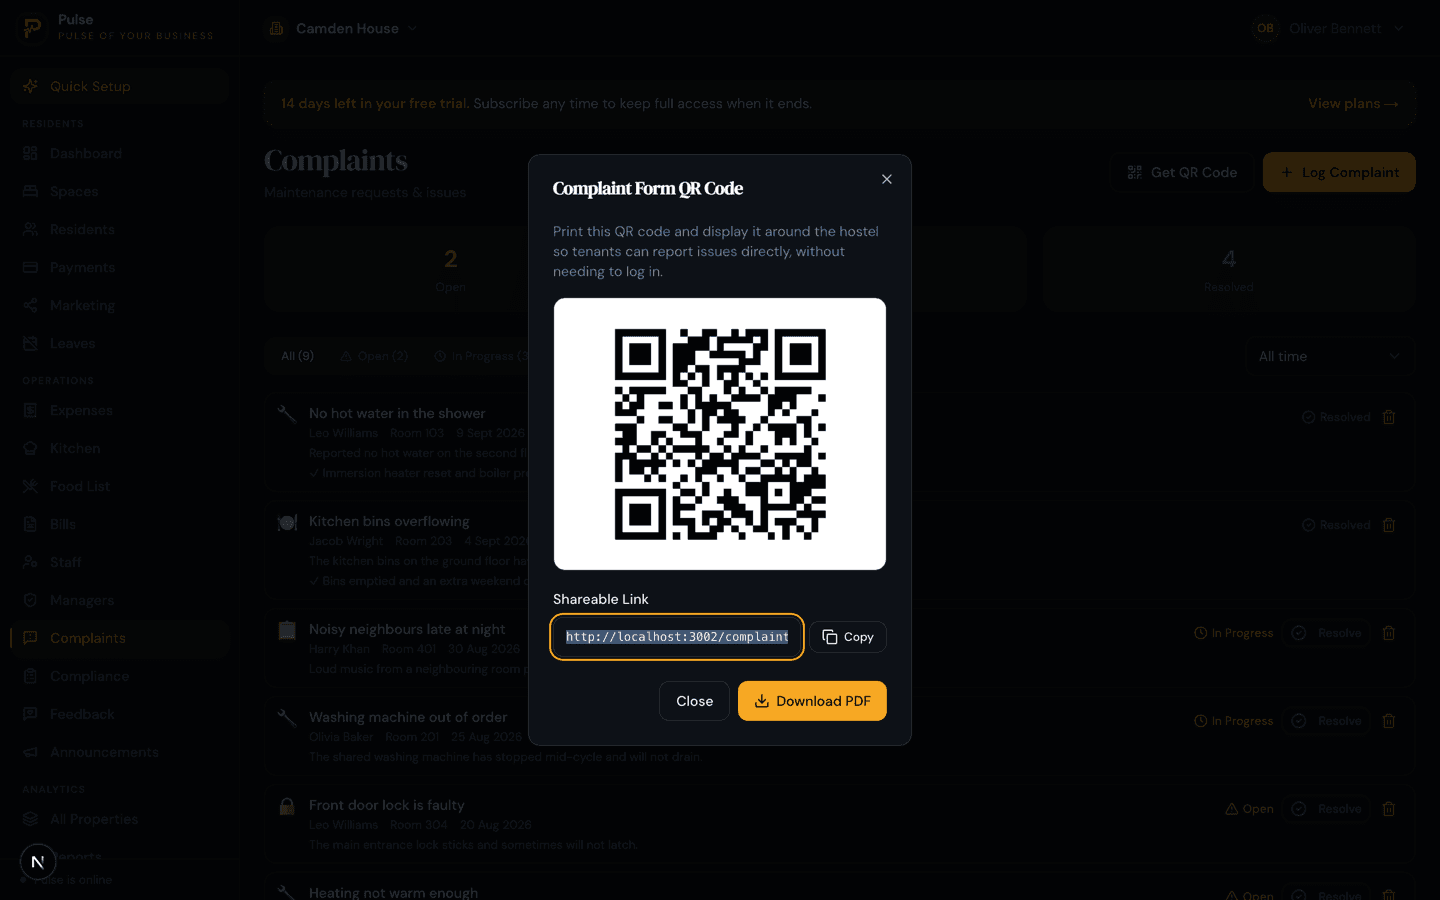
Log a maintenance issue yourself, or tap Get QR Code, print it, and put it on the wall. Residents scan it and report problems themselves, with a photo, without an account or a login. Each one moves through Open, In Progress and Resolved.
Leaves
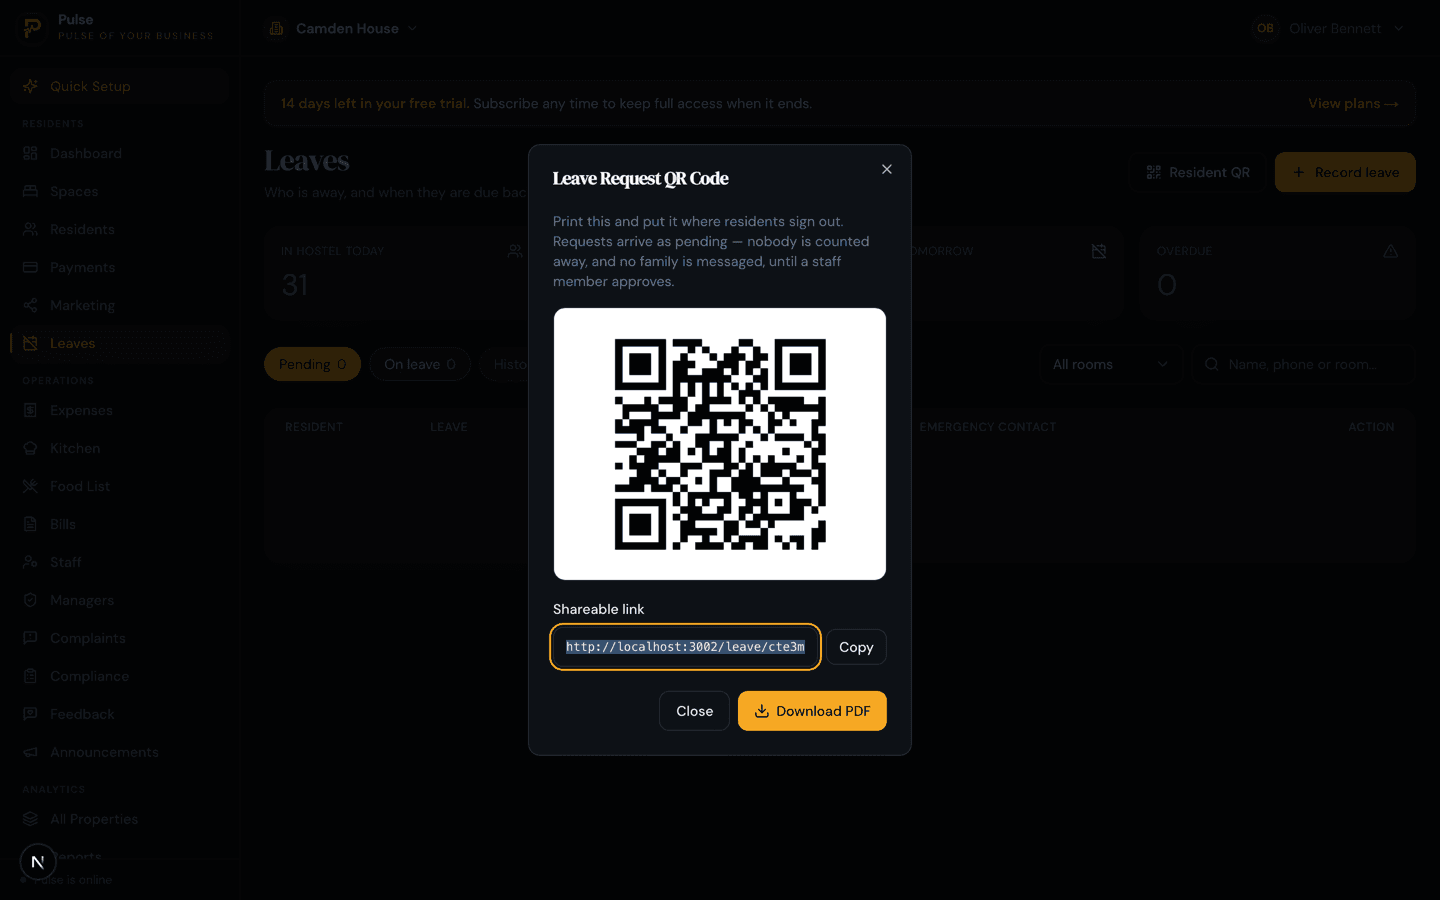
A record of who is away and when they are due back, so you know who is in the building. Staff can record a leave directly, or residents request it themselves by scanning Resident QR. A request is pending until somebody at the property approves it.
Money out
- Expenses
- One-off costs like repairs and cleaning.
- Bills
- Recurring utilities with due dates, which can repeat monthly on their own.
- Kitchen
- Grocery spending.
- Food List
- The menu you are serving.
All four feed the profit figure in your reports.
Announcements
Your notice board. Post something once and every resident sees it.
8. England only
Compliance
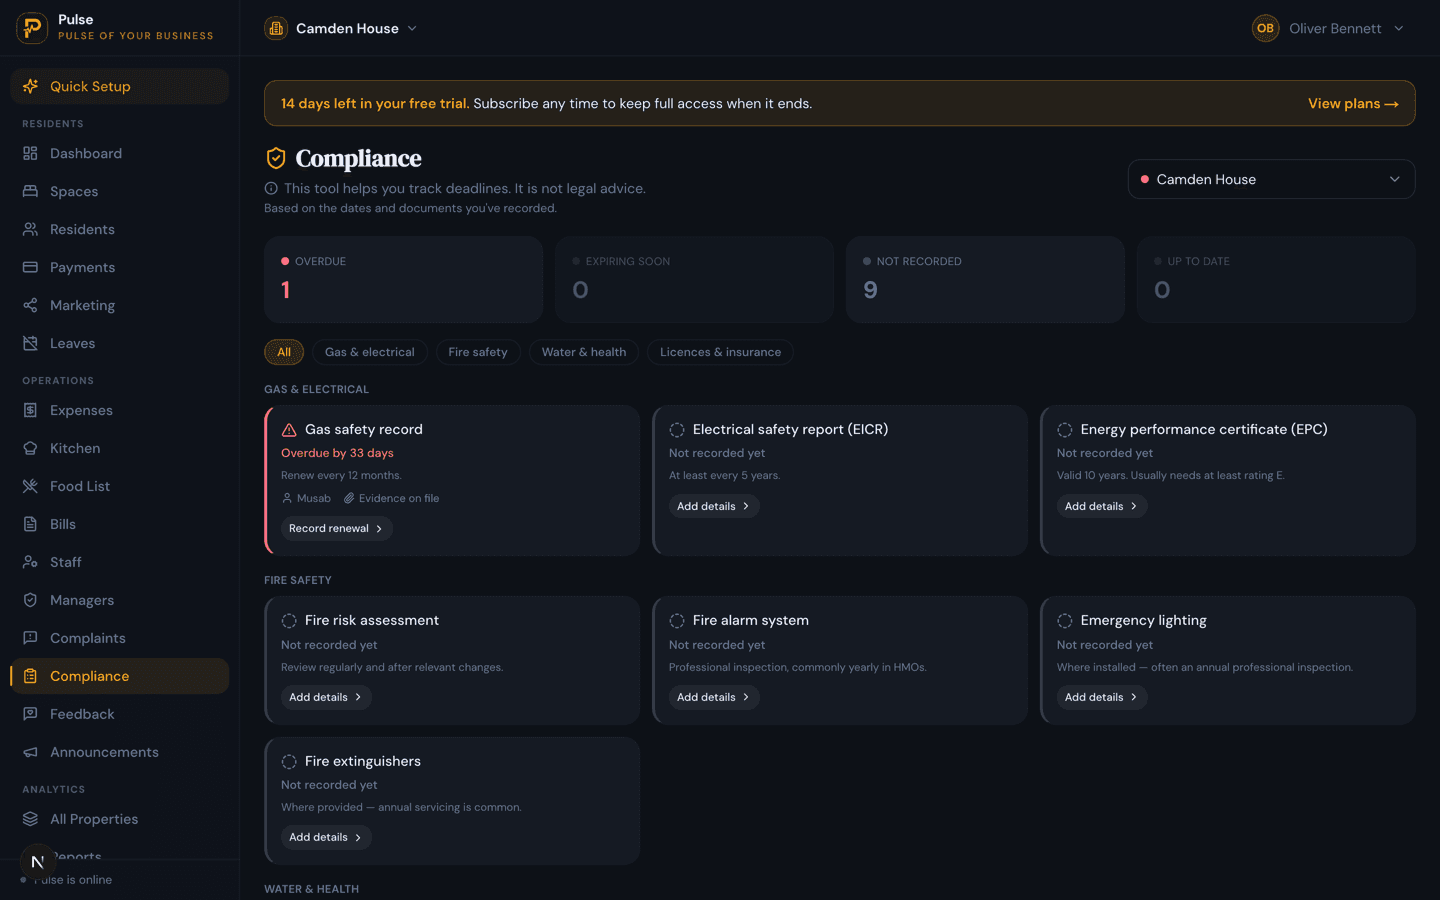
A deadline tracker for the certificates and licences an English property has to keep current. It is a reminder system, not legal advice.
How to use it
Add each certificate you hold, for gas safety, electrical, the fire alarm, the HMO licence, with its expiry date, and upload the document itself as evidence. PulseHub emails you before each one lapses and shows at a glance which properties are compliant and which are not.
Check what your own council requires. Requirements differ by authority and this page tracks dates; it does not tell you what the law demands of you.
9. Overview
Reports
Where the month adds up.
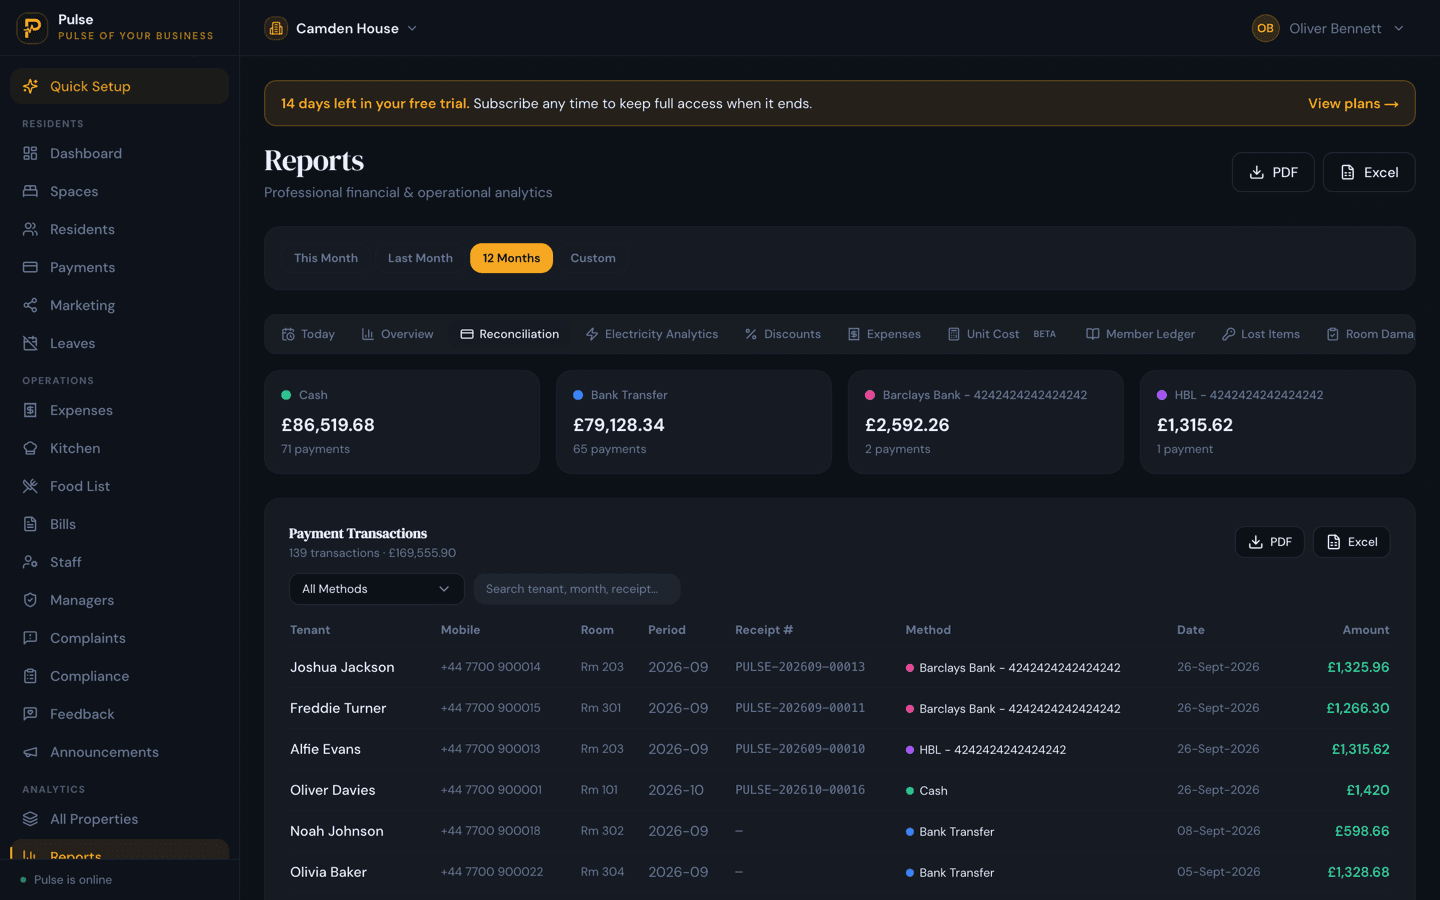
Reports
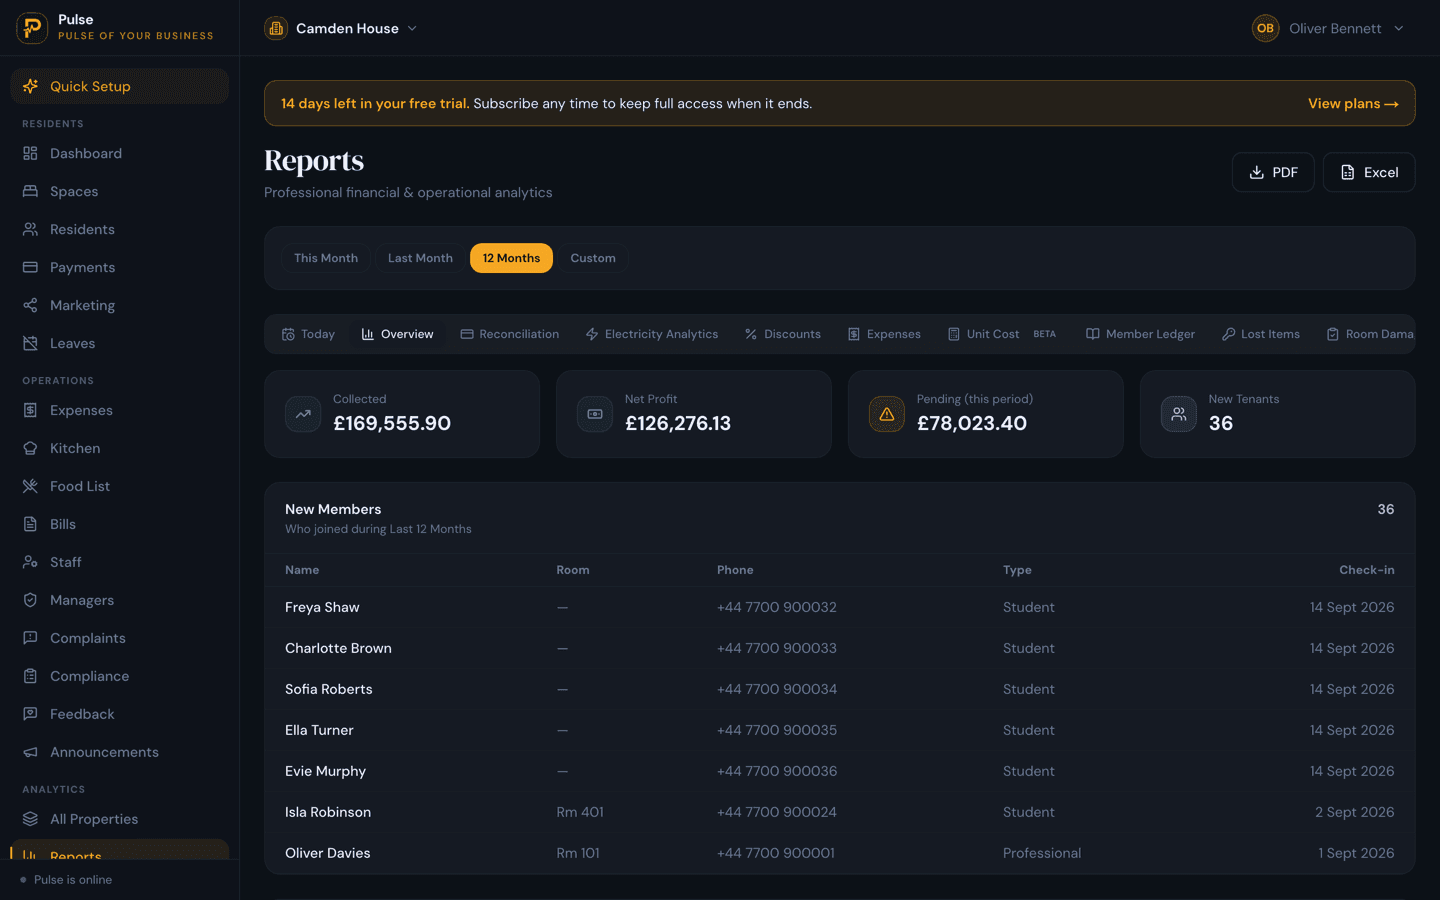
Income against expenses, what is still outstanding, and the reconciliation that ties collected rent back to the account each payment landed in. Exportable to Excel and PDF.
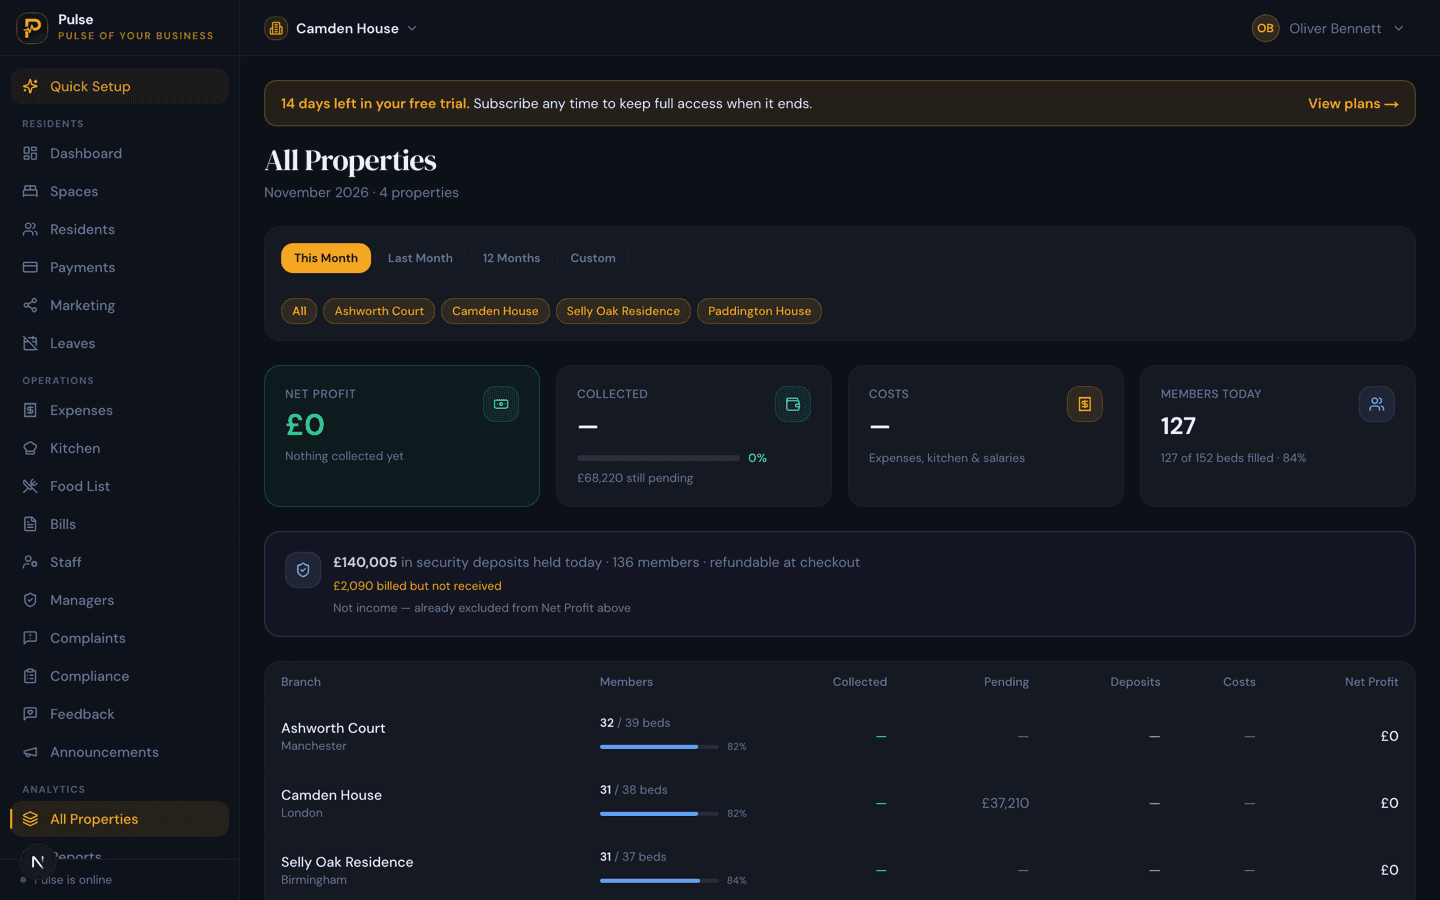
All Properties
Every site side by side, with occupancy, collection and profit, when you run more than one. The switcher at the top of every page moves you between them.
10. Paying for PulseHub
Your subscription
What happens when the free trial runs out.
Choosing a plan
Open Billing and pick a plan. You are billed per property, monthly or annually. Adding a property adds to the bill; you can cancel whenever you like and keep access to the end of the period you have already paid for. See current pricing for the plan in your country.
Stuck on something?
Use Suggest a Feature in the sidebar to reach the PulseHub team, or contact us. It goes straight to us and is the quickest way to get an answer or tell us something is missing.
Get started
Start running your property on PulseHub
Your first 14 days are free, with no card required. Sign up and follow this guide to be live in about an hour.
One platform for HMO, student, co-living & hostel operators.